QuBot: 1. Introduction - creating a simple bot
Introduction
QuBot is a set of tools for creating chatbots and virtual assistants. Below is a rule-based bot. In addition to navigation via buttons, it understands natural language text input and uses many built-in actions that can be extended with custom Python scripts.
This and the following documents are a tutorial. At the same time, it is worth looking through the Reference, which describes the capabilities of a button bot more formally and concisely.
Hello bot
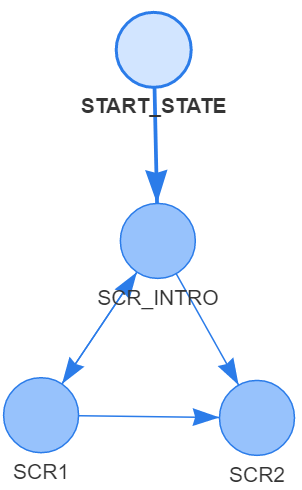
Let the bot consist of three screens. The first screen will have a text, a picture and two buttons. Pressing the buttons leads to a transition to one of the two other screens.
The screens in QuBot are called states. They are all listed in the states section. This example will have three states: SCR_INTRO, SCR1, SCR2.
In addition, there is always a mandatory system state named START_STATE. It starts first. As shown below, it consists of a single goto object that defines which state to go to (this is the first screen SCR_INTRO):
states:
START_STATE: # starting state with settings
- goto: SCR_INTRO # showing the Start screen
#------------------------------------------------------------
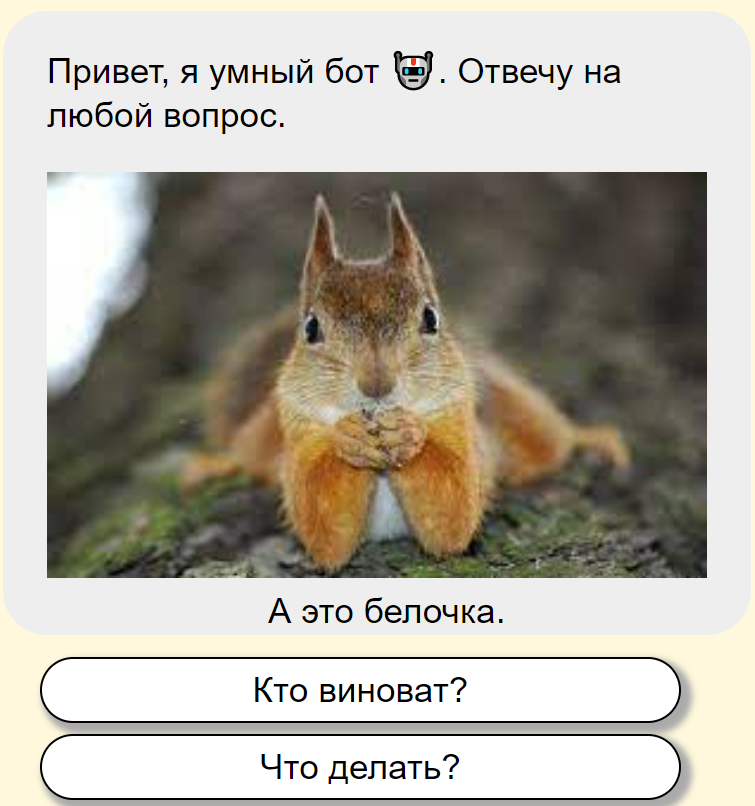
SCR_INTRO: # Start screen
- text: "Hi, I'm a smart bot 🤖. I will answer any question."
- image: "im/squirrel.jpg" # path relative to config.yml
caption: "And this is a squirrel." # text under the button
- button: "Who is to blame?" # first button
state: SCR1 # where will we go when clicking
- button: "What to do?" # second button
state: SCR2
#------------------------------------------------------------
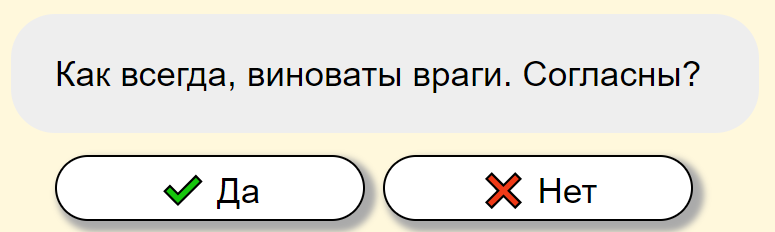
SCR1: # We fall from SCR_INTRO to "Who is to blame?"
- text: "As always, the enemies are to blame. Do you agree?"
- row: # two buttons in line
- button: "✔️ Yes"
state: SCR_INTRO
- button: "❌ No"
state: SCR2
#------------------------------------------------------------
SCR2: # We get from "What to do?" and by "No" (SCR1).
- text: "You need to make bots!"
The state consists of a list (a dash is a list item) of visual elements that are displayed sequentially from top to bottom. So, in SCR_INTRO the first element of the list is the field text, which contains the text that will be displayed first. Then in image is indicated the path to the image. The optional caption property of this section displays the text arranged below the image. Then the buttons are enumerated, each of which contains a name ( button) and a state state to which the bot will switch, when this button is pressed. The order of all visual elements can be changed, but for compatibility with messengers it is recommended to place the buttons last, and situate at least one text or image before them.
By default, buttons are displayed vertically, one below the other. For horizontal arrangement, they need to be "wrapped" with the row object, how it is done in the SCR1 state. Accordingly, there can be several such lines of buttons and they can alternate with buttons in a column.
A little about yml syntax
The bot's behavioral logic is described in yaml files. It is an easy-to-read format, but you must strictly adhere to the vertical alignment of blocks. To reduce errors, it is worth using four spaces for each nesting level (editors such as Notepad ++ are configured for this by default). While using tabs, it is important for the editor to replace them with spaces ( make sure your editor does this; in Notepad ++: Options - Options - Syntaxes [x] Replace with a space). If something goes wrong, you can check the syntax of the file at yamlchecker.com. Syntax errors will also be displayed in the debug area of the browser (see below).
The object name is followed by a colon, after which must be at least one space. For example, state: SCR_INTRO is a pair - the key state and its value SCR_INTRO. If the value is not a string, but a list, then each of its elements begins with a dash. For example, to make the state more "readable", the buttons can be listed under the optional buttons object:
      - buttons:
          - button: "Who is to blame?"
            state:  SCR1

          - button: "What to do?"
            state:  SCR2
buttons: [{button: "Who is to blame?", State: SCR1 }, {button: "What to do?", state: SCR2}]
By the way, this syntax is also acceptable in the yaml file, since this format is a superset of JSON.
There are no strict rules for formatting sections (objects) and lists (if only there are indents and alignment). However, good style is to shift the dash of the list two spaces to the right from the beginning of the "name" of this section. Then, if the elements of the list are keys values, they are shifted further to the correct position by tabulation automatically:
states:
◌◌◌◌SOME_STATE:
◌◌◌◌◌◌- image: im/image.png
◌◌◌◌◌◌◌◌caption: "text"
┕━━┙┕━━┙
Do not use a space after the key name before the colon. This way the key can be easily found in the editor by string searching " SCR_INTRO:" (without the colon it can also be found in other places, for example, in state).
Let's pay attention to the double quotes in which the texts are enclosed. Basically, this is not necessary in yaml. However, if the text starts with a dash, brackets [, {, or ends with colon (which is often the case in texts), the syntax of the file will be violated. Therefore, it is a good idea to always use quotation marks. Although in state: SCR1 the value SRC1 is also a string, but here quotes are clearly unnecessary. The hash # and the text after it are ignored (this is a comment). The more comments are used, the easier it will be to maintain the bot project in the future.
Testing
To test the bot locally on your machine, you need to download the bbot.zip archive and unpack it in any convenient place. Then the following steps are taken sequentially:
- Install Python from python. org. On the first screen of the installer, be sure to check the box "Add Python to PATH." at the bottom on the left. If you already have Python, make sure it's version 3.9 ( python --version)
- In the unpacked archive bbot.zip run the file install.cmd. It installs the libraries that are necessary for the work.
- Create a folder with any name in the static folder of the unpacked archive (for example, mybots). Place a file with the extension yml into this folder (for example, main1.yml), into which copy the bot code from this page. Warning! All bots must be situated in the static folder.
-
Go back to the root and edit the bots.yml file. This file lists all the bots contained in the static folder. You need to select an identifier for your bot (for example, mybot1) and describe the path to its folder and the name of the main module in the section bots. In addition to that, you must specify the identifier of the active bot in the key bot:
#bots.yml bot: mybot1 # active bot bots: # list of all bots mybot1: # unique bot identifier main: main1.yml # name of the main bot file root: static/mybots/ # path to the project - Run the script server_web.pyc ( python server_web.pyc or py server_web.pyc ) and then in your browser enter: http://127.0.0.1:5000/bot.
In the browser on the left, you should see a bot window. On the right is a list of slot values (variables). Slots of the type list are displayed only if they are not empty and no more than 100 first elements are displayed for them. If an error occurs, it will be entered to the right side of the chat window. You must pay attention to errors and be sure to eliminate them. When changing the project in the editor, press Enter in the browser address bar, after which the project will be reloaded.
The window with the contents of the current state can be moved across the screen (by grasping its title) and resized (the circle in the lower right corner). Double-clicking on the title minimizes the window and expands it with another click. By clicking on the transition links in this window ( state, goto, run ), you can get into another state (this only works inside this window). To return to the description of the current state, you need to click on the link in the title.
In the upper right corner, you can change the value of any slot. In the first edit field enter its name, and in the second - the value.
In the browser line, after the question mark, you can specify the name of the active bot as follows: http://127.0.0.1:5000/bot?bot=mybot1. Then the property bot in the file bots.yml will be ignored. This allows you to run several bots in different browser tabs at the same time. Examples of such links can be seen by running http://127.0.0.1:5000.
A project with a bot can be split into several files. To include them use the includes section (it can also be in any of the files included from the main module):
includes:                       # config.yml
  - "create_order.yml"
  - "delivery.yml"
Multilingual
Unlike most other bot constructors, QuBot allows you to easily create multilingual interfaces in which the desired language is switched on the fly. The default language is usually set in the start state:
    START_STATE:
      - slots:
            LANGUAGE: en            # set the English language
      - goto:  SCR_INTRO            # showing the Start screen
In the object slots predefined slot (= memory location = variable) LANGUAGE is set to the value en. After that, there is a transition ( goto) to the start screen ( SCR_INTRO).
Now all (or some) texts can be turned into objects: key (language) - value (text on it):
    SCR_INTRO:
      - text:
            ru: "Привет, я умный бот 🤖. Могу ответить на любой вопрос."
            en: "Hi, I'm a smart bot 🤖. I can answer any question."

      - button:
            ru: "Кто виноват?"
            en: "Who is to blame?"
        state: SCR1

      - button: "Что делать?"
        state: SCR2
In cases where languages are not listed, or the active language is not in the list, the first text is taken. The text above and the first button will be in English (thanks to slots in START_STATE), and the second button (" What to do? ") will remain in Russian (no titles have been defined for it in different languages).
To change the language of the bot interface during its operation, you need to create an appropriate screen (state) and call it from somewhere:
    SCR_CHANGE_LANGUAGE:                         # language change screen
      - text:
            ru: "На каком языке Вы хотите общаться?"
            en: "What language do you want to use for communication?"

      - button: "English"
        slots: { LANGUAGE: en }
        state:  PREV_STATE

      - button: "Русский"
        slots: { LANGUAGE: ru }
        state:  PREV_STATE
Pay attention to PREV_STATE. Like START_STATE this is a built-in state, which means a transition to the previous state from which we got to the given one. You can, of course, instead specify a transition to any specific state or state, the name of which is stored in the slot.
Slots
In real applications, the bot must have memory and be able to work with data. In QuBot, all data is stored in slots (variables), which are key-value pairs. The key is the name of the slot. The value can be various types (numbers, strings, data structures). Slots must first be declared in the slots section (it is located at the root level of the yaml file, in the same place as the states section):
slots:
    NAME:                                   # slot with a customer's name
        type: str                           # its type is string
        value: ""                           # initial value
Now let's make two states. The first will ask for the client's name. When submitting it from the input field ( input), the corresponding line is written to INPUT_VALUE (this is a built-in text slot). This slot, in the slots section, is saved in the above declared NAME slot:
states:
    SCR_YOUR_NAME:
      - text: "What is your name?"

      - input:                              # free input
          - slots:
                NAME: $INPUT_VALUE          # remember the input
          - state:  GLAD_TO_MEET_YOU        # where do we go
Now the slot NAME can be used, for example, in texts of other states, by placing a dollar sign $ in front of its name, which means getting the value:
    GLAD_TO_MEET_YOU:
      - text: "Рад знакомству $NAME!"       # the client's name will be inserted
How to make texts more varied
The user can get into this state many times. To prevent him from seeing the same text, you can add some variety using the again and random objects.
Let's declare in the slots section an integer slot named SCR_INTRO_COUNT:
slots:
    SCR_INTRO_COUNT:
        type: int
state:
    SCR_INTRO:

      - again: SCR_INTRO_COUNT
        cases:
            1:
              - text: "Hi, I'm a smart bot 🤖. I can answer any question."
            2:
              - text: "Hello again. I will answer any question."
            more:
              - random:
                  - text: "I see you still have questions."
                  - text: "We are interested in any of your questions."
                  - text: "Hooray! You again."
When the value of the slot SCR_INTRO_COUNT exceeds all integer keys, the list from the more section will be executed. This section contains another "variety" object random. It will select one of the list items with equal probability. Thus, during the third and further entry into the SCR_INTRO state, one of the texts given in random will be accidentally displayed.
State transitions
There are three objects to move between bot states.
- state - indicates the state to which you need to switch when an event occurs (a button was pressed, text was entered in the edit line, or a message was received) ... The state object is placed inside the event object ( button, input). If it is not there, then the value state is taken from the root of the state. If it is not even there, the state is shown again (after pressing a button or entering text).
- goto - jump without waiting for an event. The visual content above it is saved and displayed in the chatbot window. The content of the new state is then processed. This way all objects below goto are ignored, so it usually appears last in the list of state objects or under the condition if or again.
- run - transition to a new state, execution of all its objects and return back from where run was called. In a sense, this is similar to calling a function. In states called by run, it is convenient to collect frequently repeated pieces of logical or visual content.
Let's give an example with different transitions. For the object to work again, declare the slot SCR_MAIN_COUNT:
slots:
    SCR_MAIN_COUNT:
        type: int
states:

    START_STATE:
      - text: "Our glorious bot is starting to work."
      - goto: SCR_MAIN
#--------------------------------------------------------------------------

    SCR_MAIN:
      - again: SCR_MAIN_COUNT
        cases:
            1:
              - text: "Hi! How are you?"
            more:
              - goto: SCR_END


      - button: "😆 Good"
        state:  SCR_OK                 # will get here by pressing this button

      - run: RUN_BUTTONS

      - state: SCR_WHAT_A_PITY         # they will get here via buttons "So-so" and "Awful"

#--------------------------------------------------------------------------

    RUN_BUTTONS:
      - row:
          - button: "😑 So-so"
          - button: "😰 Awful"

#--------------------------------------------------------------------------

    SCR_END:
      - text: "This is the end, we won't get anywhere else."
In the state SCR_MAIN, in the object again, the second call will trigger goto: SCR_END and instead of the buttons below, the final text will be displayed "This is the end, we won't get anywhere else" from SCR_END (naturally, in real bots, such deadlocks should be avoided).
Further, in the state SCR_MAIN, the button "😆 Good" is displayed with the transition state (when pressed) SCR_OK. Then run starts the state RUN_BUTTONS, which generates two more buttons (in a line) and returns back.
The default transition state SCR_WHAT_A_PITY is described in the last status line SCR_MAIN. Since the buttons inside RUN_BUTTONS do not contain state this is what will be executed when any of these buttons are pressed.
    SCR_OK:

      - text: "I'm happy for you!"
      - button: "🚀 To the beginning"
        state: SCR_MAIN

#--------------------------------------------------------------------------

    SCR_WHAT_A_PITY:

      - text: "I feel for you..."
      - button: "🚀 To the beginning "
        state: SCR_MAIN
A little more about buttons
Buttons can display text and other visual content. To do this, you need to put an object actions:
    SOME_STATE:

      - button: "🚀 Go.."
        answer: "Fly farther"
        state:  STATE_FLY
        actions:
          - text: "And he said: "Let's go" and waved his hand."
          - image: im/Gagarin.png
In actions you can list any content (for example, change slots, call if conditions or action).
Let's pay attention to the property of the button answer. By default, after clicking on the button, all buttons are removed from the bot window and the response of a person is simulated, the text for which is taken from the button title. Sometimes this text needs to be changed, that is for what there is an answer.
For web chat , several groups of buttons can be made in one message, "interspersed" with other visual content:
    SCR_MAIN:

      - text: "Hi! How are you?"

      - button: "😆 Good"

      - text: "Maybe very well?"

      - button:  "😆 Very well"
Screens and Messages
The state (screen) usually contains visual components (texts, pictures, buttons, ...). In messengers ( telegram, facebook, ...) they are sent (if possible) in one message. If the messenger API does not allow this, the bot engine will split them into separate messages by itself.
In web-chat (a chat bot for a site), visual blocks can be highlighted with a different background color. There can be timer delays with different effects between visual blocks (typing emulation).
Each visual block can consist of components with a fixed order and arbitrary repetitions: text, picture, picture, text. The state below consists of one message block:
    SCR_INTRO:
      - text:  "Hi, I can answer any question:"
      - image: "im/squirrel.jpg"
      - text:  "Don't forget to push the button 😂."

      - row:
          - button: "Who is to blame?"
            state:  SCR1
          - button: "What to do?"
            state:  SCR2

      - button: "Why 137"
        state:  SCR137
Although this is one block, for telegram it will be split into three (text; picture; text-buttons).
Some messengers require a mandatory combination of elements (for example, in telegram there must be text or a picture in front of the buttons).
Blocks can be preceded by control commands (timer, style, ...):
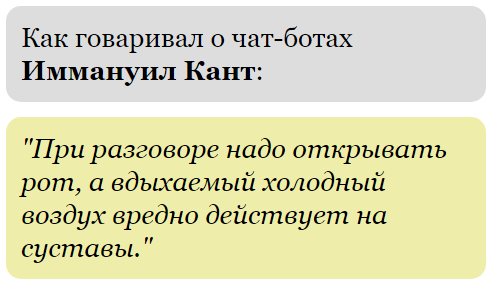
    SCR_INTRO:
      - text: "Immanuel Kant used to say about chatbots:"

      - block:                              # start of the second block
            delay: 100                      # pause before display 100 ms
            effect: TYPE                    # in web-chat, before showing, emulate text input
            background: "#eea"              # in web-chat draw on a yellow background

      - text: "When talking ..."     # the content of the second block.
     ...
 The second block is explicitly declared above. Its settings are valid until the next block. All parameters block are optional, because there are default values:
{ delay: 0, effect: None, background: bot["background"] }
To format the text, use html tags: <b> Bold font </b>, <i>Italic font</i>.
Pictograms
Any text (for example, button labels) can include icons that are unicode symbols. They are available on various sites, for example here (keyword search), or here (by category). Below are some useful icons that can be copied directly from the page and pasted into the text of the bot message:
| Yes: | ✔️ 👌 👍 | On: | ● ☑️ ✅ ❎ 🔘 | Back: | ◁ △ ◀ ️ 🔺 | ||
| No: | ❌ ⛔ 👎 | Off: | ○ 🟦 🟩 ⚪ | Next: | ▷ ▽ ▶ ️ 🔻 | ||
| Start: | 🚀 | Return: | ↻ 🔙 ↩️ ⬆️ | Arithmetic: | ➕ ➖ ✖️ ➗ | ||
| Opening hours: | ⌚ | Phone: | 📞 | Mail : | 💻 | Location: | 🗺 |
| Services: | 🔑 | Prices: | 💸 💲 | Tip : | 🦉 ❓ | Information: | ℹ️ |
| Change language: | 🌐 | Operation: | 👫 | Settings : | ⚙️ 🛠️ |
Miscellaneous:
| Emotions: | 😂 😍 🤣 😅 😁 😋 😎 😥 🤗 🤓 😙 😗 🤑 🤭 🤫 😯 🤐 |
| Gestures: | 👍 👎 🖒 🖓 👌 ✌ 👋 🤝 👏 🤘 🤟 🤙 🤏 🙌 🙏 🖖 🤞 ✋ 🤚 🖐 🖑 🤲 👐 👊 🤛 🤜 🖕 ☜ ☞ ☝ 👈 👉 👆 👇 |
| Muzzles | 🙊 😹 👀 👸 👩 😿 🦸 🦹 🧙 🧚 🧜 🧝 🧞 🧛 🧟 👼 👿 👻 👹 👺 👽 👾 🛸 💀 ☠ 🤦 🤷 🙅 🙆 🙋 🙌 🙍 🙎 🙇 🙏 👶 🧒 👦 👧 👩 👨 🧑 🧔 🧓 👴 👵 🤖 |
| Shopping: | 🛒 🧾 🚚 💰 💱 💲 |
| Food: | 🧀 🥚 🍳 🥞 🧇 🧈 🍞 🥐 🥯 🥖 🥨 🍔 🍟 🌭 🍕 🥪 🌮 🌯 🥙 🧆 🍝 🍛 🥘 🍲 🍤 🥗 🥫 🥓 🍖 🍗 🥩 🥢 🥡 🥟 🍚 🍜 🥠 🥮 🍘 🍙 🍣 🍥 🍱 🍡 🍢 🍰 🎂 🧁 🥧 🍩 🍪 🍿 🍮 🍯 🍦 🍨 🍧 🍫 🍬 🍭 |
| Fruit: | 🍇 🍑 🍒 🍓 🥝 🍉 🍈 🍊 🍋 🍌 🍍 🥭 🥥 🍎 🍏 🍐 🥬 🥦 🍄 🍅 🥕 🌶 🧄 🧅 🍆 🥒 🥑 🥔 🍠 🥜 |
| Drinks: | 🍺 🍻 🥂 🍷 🍸 🍹 🍶 🥃 🍾 ☕ 🍵 🧉 🥛 🍼 🥤 🧃 🧊 |
| Transport: | 🚲 🛴 🛵 🛺 🏍 🚕 🚖 🚗 🚘 🚔 🚓 🚙 🚜 🚑 🚒 🏎 ⛟ 🚚 🚛 🚏 🚌 🚍 🚎 🚐 🚉 🚂 🚆 🚄 🚅 🚝 🚃 🚇 🚈 🚊 🚋 🚞 🛤 🚟 🚠 🚡 ⛴ 🚢 ⛵ 🚣 🚤 🛥 🛫 🛬 🛩 ✈ 🚁 🚀 🛸 |
| Signs: | ✔️ ✅ ❗ ❕ ❔ ❓ ❌➖ ➗ 🚫 🔞 ⚡ 🔵 💧 🚩 🔷 |
| Clock: | ⌚ ⌛ ⏳ 🕐 🕑 🕖 🕙 🕝 🕦 🕢 🕜 |
| Flags: | 🏁 ⚐ ⚑ 🏳 🏴 🚩 ⛳ ⛿ 🏴☠️ 🎌 |
What's next
The following document describes in more detail how to work with slots (bot memory) and with built-in actions that perform various operations with these slots.
All examples of this document are located in the http://127.0.0.1:5000/bot?bot project = example_hello included in the bbot.zip archive.